The Processes menu is the central hub for managing your automated workflows. Here, you can create, edit, publish, deactivate, import, export, and delete processes.
How to get to Processes Menu
To navigate to the Processes Menu:
1. Click the Process menu, and then click Processes.
Processes Dashboard
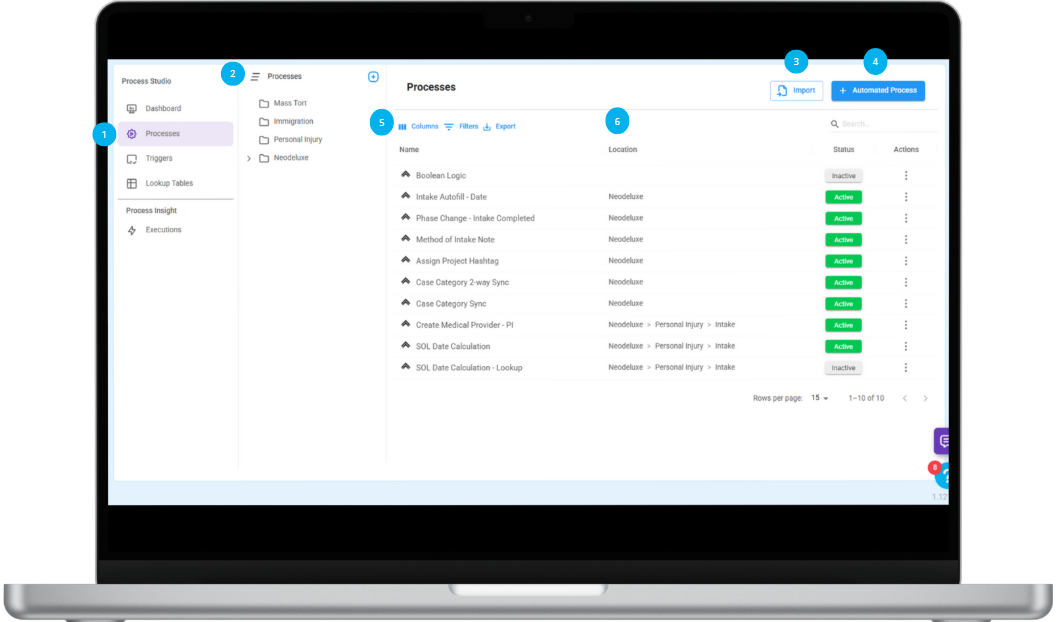
The Process dashboard provides a centralized view of the processes, allowing you to create, manage, and customize them easily. Below are the key features available on this dashboard.
| 1. Processes menu. 2. Processes folder menu. 3. Import button. 4. + Automated Process button. |
5. Toolbar (Columns, Filter, and Export). 6. Processes Table (Name, Status, and Actions column). |
Processes Folder Menu
The folder menu lets you build a custom folder structure that suits your needs. You can name folders however you like and organize them in a hierarchical layout.
With this feature, you can:
- Create new folders and subfolders.
- Organize them using drag-and-drop.
- Rename or delete folders.
When you click on a folder in the dashboard filters, it will display the processes stored inside it.
For instance, if you click on a folder called “Folder name example”, the dashboard will show the data of the processes in that folder.
Many clients work across different areas of law—like personal injury, immigration, or mass tort—and use this feature to keep their processes organized by legal area. But you're free to structure folders in whatever way works best for your team.
Manage the Processes Folder Menu
The Processes folder menu allows you to organize your workflows by creating, renaming, and deleting folders and subfolders. This helps keep your processes neatly grouped, making it easier to find and manage them as your list grows.
-
Create a New Folder of Processes
1. Click the Create Field button .
2. Enter a custom name for the new folder.
3. Click the check icon ✅to save it.
-
Create Subfolders of Processes
All process folders can have subfolders, and these subfolders can be consecutive.
1. Click the Create Field button next to the folder where you want the subfolder.
A new subfolder will be created automatically each time you click the button.
-
Rename a Process Folder
1. Click the folder menu .
2. Select Rename.
3. Enter the new name.
4. Click the check icon ✅to confirm.
-
Delete a Process Folder
1. Click the folder menu .
2. Select Delete Folder.
3. Click Delete to confirm.
-
Drag and Drop Folders
Folders, along with all their processes, can be moved using drag and drop. This feature allows you to organize folders by nesting them or relocating them as needed.
1. Click and drag the folder to its new position.
2. Release the mouse to drop it.
The change is automatically saved.
Create a New Process
The Create a New Process option lets you add a new workflow or task sequence to the system. It helps you organize and manage repeatable steps, like onboarding, approvals, or case reviews, in one place. To create a new process:
1. Click the + Automated Process button.
2. Enter a name in the Process Name field.
3. Select a Trigger that will initiate the automation.
4. Click Create. This will open the process editor.
5. After configuring the process in the editor, click Save.
Locate a Process
The Location column displays the folder where the process is stored along with the full path to reach it. You can click on the path to quickly access the folder in Process Studio.
Organize / Move Folder
The Organize / Move Folder option allows you to move a process from one folder to another. This helps you keep your processes organized and grouped logically, especially as your list of processes grows.
1. Click Processes.
2. Select a process and click the options icon in the Action column.
3. Select Organize / Move Folder.
4. In the pop-up message, select the new folder location.
5. Click Save.
The process will be moved to the new folder.
Publish a Process
The Publish a process action makes your process live and activates the automation. Once published, the process can run automatically based on the triggers and steps you’ve set. To publish a process and make the automation active:
1. Click Processes.
2. Check a process and ensure the process's status is Inactive.
3. Click the options icon in the Action column.
4. Select Publish.
Deactivate a Process
The Deactivate a process action turns off an active process. This stops the automation from running until you choose to publish it again. To deactivate an active process:
1. Click Processes.
2. Select a process and ensure the process's status is Active.
3. Click the options icon in the Action column.
4. Select Deactivate.
Export a Process
The Export a process action lets you download a process as a JSON file. This file can be imported into another instance, making it easy to reuse or share your process setup:
1. Click Processes.
2. Select a process and click the options icon in the Action column.
3. Select Export.
The document will be exported in a JSON format.

Import a Process
The Import a process action lets you upload a JSON file to bring a process into your current instance. It's a quick way to reuse or share existing workflows.
1. Click Processes.
2. Click the Import button.
3. Select a JSON process document.
The process will automatically be displayed in the process editor.
4. Click Save to finalize the import.
Delete a Process
The Delete a process action permanently removes a process from your system. Once deleted, the process can’t be recovered, use this option with caution.
1. Click Processes.
2. Select a process and click the options icon in the Action column.
3. Select Delete.
4. Confirm the deletion by clicking Delete again.

Edit a Process
The Edit a process action lets you update the steps, settings, or details of an existing process. It’s useful for making improvements or changes without starting from scratch.
1. Click Processes.
2. Click on one process name to edit.
You will now be in the process editor, where you can make changes.
3. When you finish, click Save.